Thursday, August 20, 2009

MInced Chicken Meatballs- Served with Basil Pesto Sauce and Sundried Tomato Sauce

Pan - Fried Chicken Meat Balls

These minced chicken meat balls are the easiest to make. They tasted great too. The sad part? i dont have enough pictures to describe what i did to these meatballs. I made these meat balls the way i make them for my spaghetti but instead of serving with pasta and sauce, i served them with basil pesto sauce and sundried tomatoes pesto sauce. They taste great as a snack/appetizer. Add a salad to it and it becomes a light meal, minus the pasta carbs.

Recipe:
1lb minced chicken
8oz whole ricotta cheese
1 egg
2 cloves garlic, minced
handful bread crumbs
salt and pepper to taste
2-3 tsps dried basil or italian herbs mix
1 small minced onion
1 tsp red chilli flakes- I take 4 red chillies and make my own in mortar and pestle
oil for shallow frying

Preparation:
Mix all the dry ingredients except the chicken first. Then add the chicken, donot over mix the chicken, the meatballs tend to get tough. Heat a pan and add oil to it. Drop lime size meat balls in the pan and fry them till well done. Remember, when you bite through the meatball, the meat should be juicy and succulent, not tough and hard.
Serve hot with Basil Pesto Sauce and Sundried Tomato Sauce.

Enjoy
Dipti

Sweet Corn Chicken Soup


Go to any Indo-Chinese restaurant and Sweet corn chicken soup is one of the most ordered thing on the menu. Go to any Chinese restaurant and you wont find any such soup on the menu. Egg drop soup yes. Chicken noodle soup yes. Sweet Corn Chicken soup definetly NO. So, after coming to the US, this was one of the first things I surfed on the internet for and called up my mom for. After a lot of trial and error, a little luck and lots of force feeding (forcing my hubby S), I finally got lucky with my recipe. I prepare this soup whenever its cold outside or I / my hubby have cold or whenever I cook indo-chinese food. The best part- my little duckie loves it too. He, ofcourse, eats the chicken first and then I have to make him finish the rest of the soup.

Recipe:

1 skinless chicken breast, cooked (either pressure cooked or boiled)
1 can 16oz cream of sweet corn. (I use del monte)
1 can chicken broth -use same quantity as the sweet corn( I use swanson-I use the salt free and fat free product)
1/2 tsp ginger-garlic paste
2 eggs well beaten
salt to taste
pepper to taste


Preparation:
Heat a soup pan and when warm enough add cream of sweet corn to it, and then add the broth. Mix well and add ginger-garlic paste and chicken to it. Let the mixture come to a rolling boil. Then add the eggs slowly and keep on mixing with an egg whisk. The eggs get cooked and form a stringy mixture. Let it cook a little, add water per the consistency you need, add salt and turn of the flame. Serve hot with a dash of pepper, garnish with soy sauce, vinegar/green chillies and see those sniffles vanish.

Prawns Biryani


There are different kinds of biryanis that I make. And thankfully S loves all of them. This Prawns Biryani is my mom's recipe. I dont remember eating it much as a kid. But my mom is a great magician, one day she just came up with this delicious dish and has been my favorite since. She had made it the first time my husband and in-laws had visited us after the engagement. Not as heavy as mutton or chicken biryani, very easy to make and served with just a tomato-onion raita or fried fish, this is one of my best recipes:) To tell you the truth I think my husband likes it better than my prawns curry. If done at a stretch, then this biryani can be done in under 1 hour. My duckie isnt a big fan of biryanis yet, but I am hoping that he grows up to like this biryani. I usually have prawns in my freezer, so whenever I am in a crunch as to what to cook and all I have is rice, onions, masalas and the occasional potato, guess whats right on the top of my list??

Recipe:
For the Rice:
4 cups of uncooked basmati rice
5 peppercorns
5 cloves
4 cardmoms
1" cinnamon stick
4-5 bay leaves
4 tsps clarified butter (oil will do but the flavor differs)
8 cups of hot water
salt to taste

For the Prawns:
1 lb cleaned, deveined prawns
2 large onions, diced
handful of cilantro for garnishing
1/2 tsp turmeric
1 tsp red chilli powder
1 tsp garam masala
1 TBS green masala( handful cilantro 2-3 green chillies. 2" ginger and 1 cup peeled garlic cloves pureed together. If you dont have this masala, use ginger garlic paste.)
salt to taste
oil for cooking
2-3 bay leaves

For Garnishing:
2 onions
1 large potato
2 hard boiled eggs

Preparation:

Garnishing: Slice the onions thinly. Microwave them for 5-6 mins till they turn soft, this way they fry quickly. Save your time, energy and gas. (thanks, MIL for the tip) Heat a large pot and add enough oil to it for frying. Once hot add the onions to it and fry till golden brown and crunchy. Take care they donot burn. Transfer to a plate and season with salt. Slice the potato french-fries style and fry till golden brown and crisp. Peel and slice the eggs. Keep this aside for garnishing.
Wash the rice in water and set aside. Marinate the prawns with salt, turmeric, red chilli powder, green masala. Set aside for 15 mins. Heat oil in a pan. When hot add bay leaves and then onion. Cook till light brown and soft. Add the prawns and cook well. Add garam masala and turn off the flame.
Heat a large pot and add clrified butter to it. Add bay leaves, cloves, cinnamon, peppercorn, cardmoms in quick succession taking care that it doesnot burn. Then add rice. Saute the rice till light pink. Do this on medium flame. Then turn on high flame and add 8 cups of water to it. Let it come to a rolling boil. Add salt to the water. Let the water boil for few seconds, then turn the flame on medium low and cover the pot. Once the water disappers, turn the flame on low and cook for few mins. Turn off the flame and remove from the stove when the rice is completely cooked. The rice shouldn't remain aldente. It takes a little practice, but once you get the hang of it, its really easy. Keep the rice pot covered.
Layering: This is the most important part of biryani. Take the same pot in which you have cooked rice. Empty the pot, put the rice in other bowl. Apply a think layer of clarified butter or oil at the bottoom. collect all the bayleaves used for cooking prawns and rice and arrange them in a circle at teh bottom. Divide the rice into 3 portions. Divide the prawns into 2 portions. Divide the onions into 2 portions. Layer one portion of rice at the bottom, then a layer of prawns. Then layer again with rice and then one portion of fried onions. Layer the onions with layer of prawns and then the last layer of rice. Layer the top most layer of rice with onions and french fries. Arrange the egg slices in a circle on the very top. Drizzle little warm clrified butter on the top. Cover the pot and let it cook on medium-low flame till it steams. Turn off the flame once it steams, let the stem settle for 10 mins and then serve hot with raita.
I know this might be a lengthy process for some, but it is definetly worth it. The delicious aroma of cooked basmati rice, masalas and prawns always get me salivating. My stomach starts growling as I cook and layer it. I love this biryani, and I am sure so will you:)
Dipti

Butter Chicken


This is one delicious recipe. I hit the jackpot. Thanks to Deeba of PassionateAboutbaking for the - original recipe. I tweaked mine a little to suit my taste. Do u remember ordering butter chicken in India??? Not all the places serve great butter chicken. Infact the taste varies from one place to other. And people get confused between the butter chicken and chicken tikka masala recipe. And to top it all, there are hundreds of butter chicken recipes floating around the internet, none of which suited my palate. But this, is definetly a keeper. Infact I , to date, have made it thrice in a short span of 3 months of finding this recipe. Each time it gets better and better. And yes, it does taste better with on bone chicken. But if you are out of it and are in a crunch, go ahead and use boneless breast, I wont tell. :)
Btw I am planning on using this recipe for paneer-veggie variation too. I like my butter chicken a little on the sweeter side and thats how I made it. I am waiting for my mom to get here so I can make this dish for her.

Recipe:
For the tandoori chicken
1 lb chicken on bone or boneless chicken breast
1 packet shaan masala
1/2 cup thick yogurt or ricotta cheese (it turns out creamier with cheese)
1 tsp ginger garlic paste - fresh is better
2 tsp oil for marinating

Preparation:
Marinate the chicken with the above ingredients and let it sit aside for atleast 1 hr. heat the oven to 350F and cook the chicken till tender for around 20mins. Donot overcook the chicken or else it will turn tough.

For the Gravy:
4 nice red tomatoes
1 medium onion
2 tsp oil for cookingr
1 tsp red chilli powder
1 tsp garam masala
1 tsp cumin powder
1 tsp ginger garlic paste
handful of cashew powder
1 bay leaf
1/4 cup butter
2 tsp kasoori methi
Handful cilantro for garnishing
1/4 cup heavy cream add more if you like it creamy
2 tsp honey
Salt to taste

Preparation:
Heat the oil in a pan and when hot add onions to it. saute it for few minutes and let it cook. Then add the bayleaf and the tomatoes. Cook well till the oil seperates from the sides and the onion-tomatoes turn out to be one big mess. Let it cool. After sometime, discard the bayleaf and puree the tomato gravy mix. Return it to the pan. Add all the spices. Then add the tandoori chicken and let it simmer for 3-4 mins. Be sure that you have added cashew powder, kasuri methi and garam masla. These are very important ingredients (I nearly forgot to add them to my sauce - twice). Then add the butter. Stir in the heavy cream and mix well. cover and remove from heat. Garnish well with chopped cilantro and cream.
I served my Butter Chicken with whole wheat naan. It was totally out of this world.
Dipti

Whole Wheat Banana Bread

Banana Bread cut and ready to serve

Warm Banana Bread...made mine in a cake pan


The batter ready to be put in the oven


The ingredients
My ex-colleague often used to get great banana bread to office. That's when I fell in love with it. She told me the best way to eat banana bread is warm, with little butter on the top. Ofcourse the banana bread she used to get was from a ready-mix packet, but still it was great. Many months and a pregnancy with banana bread craving later, I had my first home-made banana bread at a friend's baby shower. And guess what???? It was whole wheat bread AND instead of butter used olive oil. Now some people (my husband S) might argue that banana bread tastes great with all-purpose flour and butter, but with a kid now, I am looking for heathier options.
This bread had more of cake like consistency and it was moist and tasted great.
The best part about banana bread??? the way the entire house smells when baking it. For me, some smells remind me of my childhood and the fun I had. Banana bread smell makes me feel warm and comfortable and safe. :)
Recipe:
3 very ripe bananas
1 1/2 cup of whole wheat flour
1/3 cup olive oil
3/4 cup sugar, take little more if you like it sweet
1 egg, beaten
1 tsp vanilla
1 tsp cinnamon powder - optional
1 tsp baking soda
pinch of salt
Preparation:
Preheat the oven to 350F.
Mash the bananas in a large mixing bowl.I donot like big chunks of banana in my bread, so i mashed mine extra fine. Mix in all the ingredients one by one, add the flour in the last. You just need a spoon to mix the ingredients. I did not have vanilla so added just the cinnamon. Pur the mixture in a baking pan. Cake pan, in my case:) bake for 1 hour and your house will smell wonderfully delicious. Cool and cut and serve. Moist and wonderful banana bread is ready.
Like my friend said, the best way to eat banana bread- Warm with butter spread on the top.
Dipti


Wednesday, August 19, 2009

Need to take better pictures

There are so many gorgeous food blogs on the net. And not just because of the food, but because of the pretty pictures that each blog has. Sometimes I feel embarassed of the quality of pictures I have.
So I made a promise. To myself. And to my adoring fans i.e. ME for right now. I promise to take make and put up better pictures of the food I cook. Because sometimes its not the recipe but the pictures that put you off. Somehow boring yucky food also looks good with great pictures. Its all in the presentation. Serve me a great designed platter and I will snarf it down. Same with pictures. Sad pictures and none wants to even read anything.
Oh well.
So here's to a better picture blog and great recipes.:)
D

Veggie Spring Rolls


All ready to be eaten


Half and Half


The mixture


While Cooking The Mixture

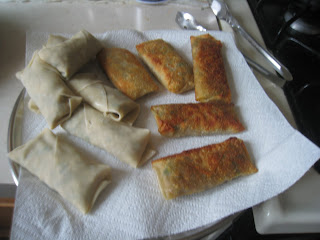
These Spring Rolls are my very very favorite. Like I mentioned before, to me, no indo-chinese meal is complete without spring rolls. I am salivating just thinking and writing about them. In India, many restaurants serve spring rolls with the noodles mixed in them. They taste good too. The earlier version had just 2 veggies in them. I used a coleslaw mix for these rolls, added julienned ginger and minced garlic, little chopped green onions and salt and pepper. S just loved it. Dukie loved the crispy cover and had little veggies to eat. But he liked it too. The Nasoya brand of wrappers had 15 wrappers I think. And they were big. So I made spring rolls for 2 consecutive weekends.


Recipe:

1 packet coleslaw mix

bunch of spring onions chopped

mung sprouts (optional)

salt to taste

pepper to taste

1 tsp minced ginger

1 tsp minced garlic

2 tsp oyster sauce

6-8 wrappers

oil for frying


Preparation
Heat a wok and add oil to it. On high flame add the ginger garlic first and then coleslaw mix, sprouts and spring onions in rapid succession. Stir fry on high heat for 3-4 mins. Tunr of the flame and the add oyster sauce along with salt and pepper. Let the mixture cool for few mins. Scoop a single spoonful of the mix on a wrapper and roll, fold and seal per the packet directions. Prepare all the rolls like this.

Heat a frying pan and then shallow fry the spring rolls. Serve hot with ketchup on your own fav sauce.

Dipti


Carrot-shrimp Spring rolls

Spring Rolls all ready to be eaten

Folded and ready to be fried


The start
Spring Rolls to me are an essential part of Indo-chinese cuisene. Whenever we go out to a chinese restaurant in India, we ALWAYS used to order this crispy fried roll of either vegetables or meat-veggie combo. The most difficult part is to do the wrappers right. In Indian restaurants, these spring roll wrappers are always made fresh from scratch using all-purpose flour and egg mixture. I have done that twice or amybe thrice in my cooking lifetime. But somehow, it always misses its mark. The wrapper doesnot turn out that great.
One fine day on my visit to our local supermarket. I literally stumbled upon these organic ready to be fried and eaten wrappers. Welcome to the Nasoya brand of goodies. These were really good as compared to the other brands I have tried. And since these were made of soy, I felt less guilty of eating fried rolls. Though I am sure these can be oven-fried, I was impatient enough to try them fried.
Made them on my whim and they were great. I used the basic recipe given on the back of the wrappers. ofcourse, I made my own changes.
Recipe:
6 wrappers
1 cup grated carrot
2 tsp grated ginger
1 bunch spring onions finely chopped
salt to taste
Black pepper to taste
2 tsp oil for cooking
6 shrimps finely chopped
2 tsp oyster sauce
Oil for shallow frying
Preparation:
Heat a wok and add oil to it. Once hot, add shrimps and ginger and let it cook. Then add carrots and spring onions and stir fry on high heat for 2-3 mins. Turn of the flame and then add salt, pepper and oyster sauce to taste.
Let the mixture cool.
Take a single wrapper and scoop 1 tsp of mixture onto it. Fold and roll the wrapper and seal it with water. Finish folding all the wrappers per the packet directions. Heat a frying pan and add oil to it. When hot enough fry rolls in it. Fry on medium heat so that the wrappers are cooked from inside too and are golden-brown crispy on the outside.
Serve hot with ketchup or any other of your fav sauce.
Dipti


Friday, August 14, 2009

Chicken jalfrezi

The final product

Cooked chicken pieces


Veggies being cooked
The credit for this awesome recipe goes to my mother-in-law, who on her first visit to the US taught me this very simple and delicious recipe. This is a favorite of S. Because it contains tomato ketchup, tomatoes, little soy sauce and spices, it is a balance of sweet and sour and spicy chicken. I used boneless chicken breast for this but you could use bone-in meat and then shred with hand after it is cooked. The best part of recipe..??? it requires less amount of chicken because of the veggies in it, so make this when you have less chicken on hand.
Recipe:
1 lb boneless chicken breast.
1 tsp ginger garlic paste
1tsp red chilli powder -increase/decrease the spice level as you want
1 tsp roasted cumin powder
1 tsp corriander powder
salt to taste
1/2 cup yogurt
oil for cooking
for veggies:
1 large onion sliced thin
2 small tomatoes sliced thin
1/2 green or red bell pepper sliced thin
1/2 tsp turmeric powder
1/2 tsp red chilli powder
1/2 tsp roasted cumin powder
1/2 tsp corriander powder
salt to taste
2 TBS tomato ketchup
1 tsp soy sauce
1 tsp sugar to taste ...adjust quantity accordingly:
oil for cooking...2 tsp
Preparation:
Dice the chicken into bite size pieces and marinate with all the spices, yogurt, salt and ginger garlic paste. Heat some oil in a wok and once hot, add the chicken pieces to it. Cook it done and the liquid evaporates. Remove and keep aside. Heat the remaining oil in the same wok and once hot add all the veggies at once. Cover and let cook till done. Add the spices and salt to taste. Cover and let it steam once. Then add the cooked chicken and mix well. Add the ketchup and soy sauce along with sugar. Cover and let it steam once. The final taste of the dish should be sweet-savory with hint of sourness.
Enjoy hot with naans, rotis or parathas.
Dipti

POTATO GRAVY

"Rajasthani" Potato Gravy
I had this Potato gravy while visiting Jaipur and other cities of Rajasthan. My father-in-law loves this potato gravy. So, my ingenous MIL created this gravy on a whim and it turned out very good. Thanks to my MIL for this great and simple recipe.

This gravy doesnot have any complex masalas but the basic stuff you ALWAYS have in your pantry. How come something so delicious could be created from something so simple??? Well, the answer is in the process of cooking, having fun with it and hoping for a great taste:). We had Satyavinayak puja at our place in June. I was finalizing the menu. Had almost decided to go ahead and make chole-puri for 40 guests. Then MIL made this awesome gravy one day. And thats it. I immediately fell in love with it, begged my MIL to make THIS gravy for the puja. Graciously she agreed. Cooking for 40 guests is no easy feat. But we all helped and she managed it. This potato gravy was the main star of my menu. Everyone loved it. My friends begged for the recipe. MIL got dozens of compliments. My party was a BIG success thanks to MIL and this gravy. Everyone loved it so much that hardly any was left for my husband and his brother (the last dinner eaters). This humble and nonpretentious potato gravy is best served hot with hot puris.

Recipe:
2 large potatoes
1 medium onion
1 tomato
1 1/2 tsp corriander powder
3/4 tsp cumin powder
1/2 tsp mustard seeds
1/2 tsp cumin seeds
1/2 tsp turmeric powder
1 tsp red chilli powder
1/2 tsp garam masala powder
pinch of asafoetida
salt to taste
3 tsps oil
handful cilantro -washed and chopped

Preparation:
Boil the potatoes till more than fork tender. This is best done in a pressure cooker and then keeping it on low flame for 10-15 mins before turning off the gas. Peel and chop them into chunks. Dice the tomato and the onion.
Take a kadai and heat oil in it. Once hot, add asafoetida and then mustard seeds. Let the seeds sputter and then add cumin seeds. Add onion and start cooking them. Once they are half -way done then add corriander powder and cumin seeds. Fry the onions on medium-high flame till you get the masala smell and the oil starts seperating. Once the onions are cooked add tomatoes, turmeric and red chili powder and salt. Cover and cook till oil starts seperating from the mixture. Then add the potatoes. Cover and let it cook completely. Add little water to get gravy like consistency. Add the garam masala powder and mix well. Garnish with cilantro.
Serve hot with puris
Enjoy
Dipti
Bold

Thursday, August 13, 2009

The Yeast Problem

I made whole wheat naans yesterday.
And they were great.
BUT the yeast gave me a lot of trouble. I had to use 3 packets of active dry yeast till I finally got it right. And I decided to go ahead with the last try simply because I was out of yeast packets and too lazy to go out and buy some. The first 2 tries were total disasters. The yeast just sat there mixed with milk looking like sand granules mixed in, only that sand would sink. The yeast refused to froth and become bubbly as promised. I had kept it in warm place as required. Maybe it was the temperature of the milk. All over the internet it says "warm" liquid. Could you please define WARM? The yeast manufacturer's website said 110-115F liquid. Now at that temperature you cannot drink liquid so how can that be warm??? For me, (and I hope many other people too) warm means drinkable temperature.
Then I realized I didnot have any cooking/candy/liquid thermometer. So I went ahead and borrowed my duckie's thermometer. It showed fine till 107F then started beeping. Which meant a good, high temperature for me. Then I added the yeast and mixed it well. Kept it near the oven to let it "froth" which it did not. After 15 mins I gave up mainly out of boredom and mixed it with my flour. Covered my dough, checked the clock, kept my fingers crossed and decided to check again after 1 1/2 hrs, just because then it would be too late for dinner. After around 1.5 hrs, the dough had risen. I punched the life out of it and made some naans.
AND they were good. I loved them. Ofcourse whole wheat naans taste different than the all purpose flour ones, but they are healthier.